Sushant Risodkar

Drive New Traffic to Your Blog Using Spotplex

spotplex-logo.gif

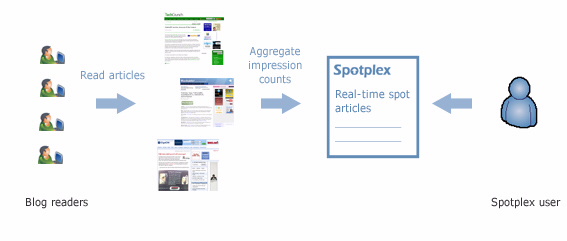
Are you someone who always submits your blog posts to Digg hoping it gets enough “Diggs” to make their front page? Well, here’s a new site that takes all the work out of having to submit your post each time. Spotplex is a free service that dynamically provides an instant, impartial ranking of popular web content based on unique number of page views. That means the more people that read your blog posts, the more popular your content is and it will rank higher on Spotplex.

By inserting a single line of HTML code into your blog, you can instantly track the number of post reads. This will then be dynamically updated on the Spotplex site which is essentially like the Digg.com model, except you don’t need to vote or “Digg” a post. The voting is done dynamically by how popular your blog posts are.

Their free service also provides you detailed analytics of your blog as well as potentially driving new traffic to your site. Spotplex also offers bloggers downloadable widgets to instantly analyze viewer traffic and to list other popular articles on your blog, increasing reader retention over time. Here’s an illustration as to exactly how the Spotplex model works.

spotplex-how-it-works.jpg

It’s fairly easy to install for both Blogger and WordPress and is only one line of javascript code. All you need to do is enter your blog url and Spotplex will automatically find your rss feed and provide you with a few options for installing it. The sidebar Spotplex widgets seem like a pretty cool addition as well but I didn’t bother using them.

spotplex-img.jpg

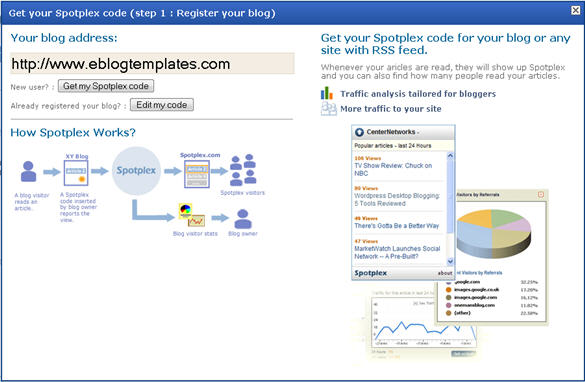
You’ll then be asked which type of blog platform you’re using (supports multiple types) and if you want a Spotplex image or not. You can also easily add it to your Blogger blog by clicking on the “Add Widget” button. This way you don’t need to muck with the template code. I prefer to not use a widget and just paste the javascript code (without the buton) right into my template somewhere in the HEAD section.

spotplex-img2.jpg

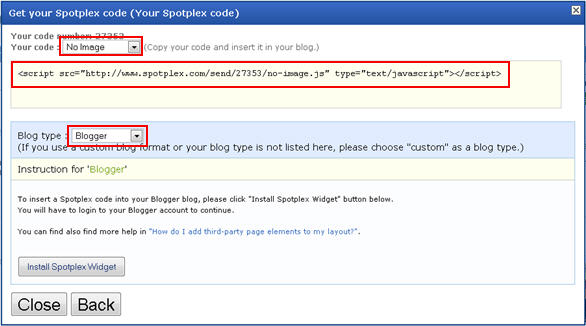
WordPress users can add it as a sidebar widget or also just copy the .js code and paste it into their header.php file.

If you are tired of “Digging” each one of your posts and your site gets a lot of traffic, this might be a great alternative for you. Spotplex is nowhere near as popular as Digg (at least not yet) but it doesn’t hurt using both services especially since Spotplex requires no manual post submissions. Give it a try and let me know what you think.

You can easily add recent Post Widget into yours blog with One Click and some little Edit in it ,The most important advantage of this recent post widget is that you can show from 10 to 100 recent post in to yours Blogger webpage or any other web page whether it is wordpress or it is Blogger .If you are blogspot User then Just click below Buttom to add Recent Post Widget into yours Blog . Remember you have to do a Little Edit in recent Widget code.


After adding recent widget in yours blogs Go to Dashbord >>>Layout >>> Edit Recent widget Html and put yours blogspot webpage name there or yours website name there as seen in image below.


————————

Just like the above one you can also add recent comment widget directly into yours blogger webpage ,this is a customize blogger widget and you can edit this directly from yours blogger account after adding this widget .
The most important features of this widget is that it provides you the option to display from one to more then hundred comments ,and controls number of characters to display in comments ,At present this widget is displaying 100 words, if you want to edit this you can do this from Html code after adding this widget into yours blog,

50 Great Widgets For Your Blog

Widgets are a great way to add some flare and uniqueness to your blog. Whether you’d like to show your live blog traffic stats or show your visitors which sites have recently linked to your web site, you can do it with widgets.

I recently came across a list of 50 great blog add-ons that are useful or simply just cool widgets and wanted to share it with you. Most of them work with both WordPress and Blogger so it doesn’t matter which blogging platform you use.

Go through the list and pick and choose some new widgets to test drive on your blog. I recommend not overdoing it by dressing up your blog with too many widgets. There’s a fine line of functionality vs clutter and a blog with too many confusing widgets will only deter people from your site.

So check out Mashable’s 50 Great Widgets article and let me know which widgets you like best!

If you like this post then please consider subscribing to our Templates Treasure RSS Feed

A favicon, also known as shortcut icon, website icon, page icon or urlicon is a small, square icon, usually 16×16px in size, that is displayed alongside the URL in the web address bar of a web browser.

The reason for using a favicon is branding. Most modern web browsers allow tabbed browsing. This means that a user can open several websites in the same browser window. A nice favicon design will distinguish your blog / website from the other websites.

Some modern browsers also allow favicons to be displayed in the Bookmarks section. Again, this will ensure your website will be distinguished from the others.

Favicon formats

The most widely used favicon format is .ico. Other favicon formats used are .gif and .png. You can also add an animated gif as a favicon, but this is currently only supported by Mozilla Firefox. Even though this is only supported by Firefox, there is the possibility of using multiple favicons. For example you can use an animated one which will display in Firefox and a static one which will display in the rest of the browsers.

Favicon Design

A favicon has a 16×16px size so to design it it’s advisable to use a larger size such as 128×128px and then scale it to 16×16px

To get the favicon on your blogger, you need a code to add to your template, and this is it:

<link rel=”shortcut icon” href=”http://myfavicon.com/favicon.ico” />

<link rel=”icon” href=”http://myfavicon.com/favicon.ico” />

Replace “http://myfavicon.com/favicon.ico” with the URL of where your webspace stored your ico file, & paste the code between the head tags of your blog. The favicon will now appear in most browsers address bar and bookmarks. (Not sure about the rhyme or reasoning here, but some do…some don’t.) Added bonus! If you use Mozilla Firefox (why wouldn’t you?) it will also show up on the tabs!!!!

Guidelines

  • The link elements must be inside the head element in the HTML.
  • Use the appropriate resolution and color depth : ICO – include multiple resolutions (the most commonly used being 16×16 and 32×32, with 64×64 and 128×128 sometimes used by Mac OS X) and bit-depths ; GIF – use 16×16 in 256 colors ; PNG – use 16×16 in either 256 colors or 24-bit.
  • For XHTML, the link element must be terminated by ” />” instead of “>”.
  • The .ico file format will be read correctly by all browsers that can display favicons.

Favicon Inspiration

Get a Free .Com Domain and Blog!

5 Days ago i have joined the Hyperwebenable free domain and blog program.I applied for eBlogskins.com domain.Within a week i received an email to confirm the free domain.They have provided the username & password to manage my free domain and blog in WordPress.You can view the screenshot of the email below:

You can view eBlog Skins site,I have added the posts which are present in this blog.So grab the free domain and blog as fast as much you can;). Just go to Hyperwebenable and complete the application and get the .com domain in a week.

Use HyperWebEnable to..
1. Get a Free website, get yoursitename.com instead of yoursitename.freeblogsite.com.
2. Build a full fledged content site and unleash the power of your site.
3. Get various addon scripts to your blog.
4. Take full control of your blog and customize per your needs.
5. Monetize, make money with your website.

HyperWebEnable Offers…
1. Free website of your choice (yoursitename.com).
2. 1GB of webspace to host your website.
3. Unlimited bandwidth.
4. Unlimited emails (info@yoursitename.com,contact@yoursitename.com).
5. Scripts of your choice(Blog,CMS,Forum ..).
6. Technical support by email for your website.
7. Tips & tricks to improve your page rank and traffic.
8. Free renewal of your domain.
9. No hidden fee or payments.
10. Ads on your Blog.

Why hyperwebenable.com is best Compare Other blog services

Other faq and help will be found on their site.


Top 10 Search Terms:

• free domain no money

464748495051525354555657585960616263646566FirstLast


whos.amung.us