BLOGGING PROFIT FORMULA

make money online

Discover The SAME Formula That I Use To Rake-In $10K+ every month! Enter your details below and DOWNLOAD The Blogging Profit Formula For FREE! This Is The Same Formula I Use To Make Money Online on Autopilot...

First off, what is the Blogger Navbar?
The Blogger Navbar appears by default at the top of every Blogger-powered blog. It is available in several colors, and is configured in the Template tab in Blogger’s interface. If you are using a classic template, you’ll see a menu from which you can select a color. For blogs using Layouts, just click the “edit” link on the Navbar page element. Blogger gives a more detailed explanation of this here.

There are several reasons why I think it’s important to remove the Blogger nav bar but I’ll name my two most important reasons. First one being that it’s an eye sore and makes your blog look less professional. Secondly, when you click on the “next blog” button you never know what type of blog you might stumble upon. There are so many spam blogs with adult content or other information you don’t want young people to read. When you do block the navbar on your own blog, you prevent others from also easily leaving your site and accidentally heading to one of these spam sites.

Unfortunately Blogger doesn’t give you the option to remove the navbar easily but this simple modification to your template allows us to hide it. The good news is that it’s not against Blogger’s TOS so it’s not illegal to do. I read a post recently by Blogger Support that stated

While it’s not officially against our TOS, we discourage folks from removing it because we think it’s a great feature with more improvements to come. Follow the above instructions at your own peril, as Blogger controls the TOS and has been known to change it.

So the change you want to make is to the stylesheet. First make sure you backup your current template just in case you make a mistake. Click on the “Download Full Template” link ( go to “Template” => “Edit HTML”) and save it locally. Next, from within your template code you (don’t need to scroll down for it) add this code:

#navbar, #navbar-iframe {
height: 0px;
visibility: hidden;
display: none;
}

After that, save your template and view your blog. The top Blogger navbar should have disappeared! Looks much better now doesn’t it? If you ever want to add the navbar back, it’s simple. Just remove the line of code we just added. Also, if you ever switch templates, make sure to follow these instructions again because it needs to be done with each new template you use.

tla-logo.gifIn the first article of our series, “How to Make Money From Your Blog – Tip #1” we covered the most popular and easiest way to monetize your blog using Google AdSense. Our next tip is another great way to create a steady flow of income from your blog on a monthly basis.

Believe it or not, it’s by selling text links on your blog. Yup, you heard me right — people will pay you to put links on your site.

Why would people buy links from my blog?

That’s a very good question and there’s several reasons. The most popular one being it helps their site rank higher in search engines like Google and Yahoo. Essentially, the more backlinks you have pointing to your website, the more important your site is (in Google’s eyes).

There are many other factors involved and I could write an entire article about it but we’re going to stay on track. Another reason is because buying links from another site drives additional traffic to their site but this is seen more as a bonus since 99% of people who buy links do so for the backlink value.

That’s great and all but how do I get started?

You could easily build your own advertising page and tell visitors “Text links for sale” but you most likely won’t make any sales (unless you’ve got a really popular site with lots of traffic already). So instead, let’s leave the sales, marketing, and invoicing of your links to a 3rd party who’s already established in this space.

I use (have been for a few years now) and recommend Text Link Ads. They are a well established link buying and selling company which means you don’t need to do anything except add your listing, set a price, and approve new links.

Personally I like selling links through TLA better than Google AdSense because it’s guaranteed monthly revenue. Google AdSense is CPC which means you only get paid when someone clicks on your ad. Using Text Link Ads, you get paid just for letting someone put a link on your site. You set the price, they buy the link, you get paid. It’s that simple. I make several hundred dollars a month from different niche blogs just by selling links using TLA.

Step #1 – Sign up for Text Link Ads

This is the first step for any new advertising program and usually the hardest. TLA carefully selects which sites can be added to their network so if your blog is brand new, then you should wait at least 6 months before applying. If decide to apply anyways and get denied, I’d send them an email and ask to be manually added.

Their automatic approval system runs some basic calculations on your site (blog age, page rank, popularity, etc) which determine whether you’ll be approved. I’ve actually been rejected for a couple of my blogs but when I emailed them, they manually approved them. Sign up for Text Link Ads and start selling links today!

Step #2 – Add your Listing to their Marketplace

Assuming you’ve been approved, you can now login and setup your site. This is where the power of TLA comes into play. They have a virtual marketplace where you list your site and hundreds of visitors (if not thousands) a day have a chance to see your site.

You’ll enter your site title, a brief description, select a category where your blog belongs, how many ad spots you have available (Blogger limits you to only 5 per link widget but you can have two widgets for a total of 10 links), etc. The price is determined by TLA but again, it’s negotiable. I’ve emailed them asking to raise the price on at least two of my blogs and they did it no problem.
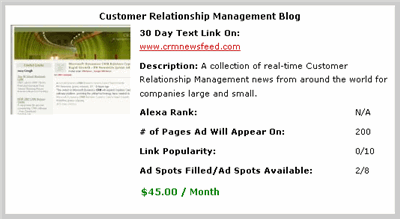
tla-example.gif

Once you’ve added it, your listing will look something like the above screenshot. This is what anyone visiting the TLA marketplace will be able to see.

Step #3 – Installing the TLA Code onto your Blog

This may sound intimidating especially if you’re not comfortable editing template code but it’s simple. Text Link Ads has a wizard script that walks you through the entire process. The only part you need to do is create a new page element on your blog (you must be using the new xml Blogger templates to do this).

Here are the two steps you need to complete within your TLA account before actually going into your Blogger template page elements.
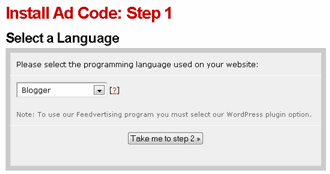
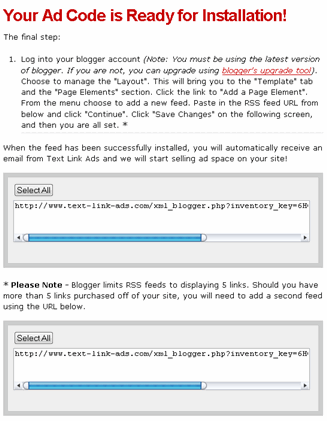
tla-step1.gif

tla-step2.gif

Now that you’ve got the code, you can just follow the instructions that TLA provides about plugging this into your Blogger template. Once TLA verifies that the Ad Code you installed is setup properly, your listing will show up in their marketplace. Then it’s only a matter of time before you make your first text link sale.

Don’t get frustrated because it might take a few months before that “You’ve got new links to approve” email comes from TLA. You need to think of this as a long-term investment because once someone buys a link, they’ll want it for several months.

More facts about TLA

  • You receive 50% of the sale price for each text link ad sold off your blog
  • You can display Text Link Ads on the same page with Google AdSense, Yahoo! Publisher Network, and other contextually served ads
  • You get paid monthly directly to your PayPal account or have them mail you a check
  • Easy to setup and start on Blogger

So what are you waiting for? Go sign up for Text Link Ads and setup a publisher account and monetize your blog now. It kills me when I see blogs out there without any sort of advertising. I can’t stand the “Made for AdSense” sites but if you’ve got a blog, why not put a couple ads or links to help pay for your lunches?


For many people blogging is a way to express themselves online for the rest of the world to read. Usually it’s about a specific topic or if it’s a personal blog, then the blog posts could range from anything like your latest trip to Europe or how your dog just had puppies. Nevertheless, blogging is easy for anyone with a computer and internet access to use.

So for those who enjoy writing and spend lots of time doing it, why not make some extra money from it? It doesn’t cost you anything and only requires a little bit of time to setup but the return could be well worth it. That’s the beauty about online advertising programs — they work 24/7 even when you’re sleeping. Talk about a nice passive way to earn some extra money each day!

My first tip is probably the most popular method (and easiest) way to get started with making money from your blog. It’s a program called AdSense from a small company you’ve probably never heard of called Google. :-) Knowingly or not, you’ve viewed hundreds of Google’s ads online and probably even clicked on a few since they were relevant to whatever topic or website you were reading at the time. That’s one of the great things about this program and I’ll talk more about it further down this post.

Use Google AdSense

Google adsense logoGoogle’s advertising program is free to sign up and you can usually be online within an hour or so (assuming your application is approved quickly). Then adding AdSense to your blog is easy especially with Blogger’s new AdSense widget (it’s quite simple with WordPress as well but I’m going to assume WordPress users already know how to do this since it’s just cut and pasting html). Once your application is approved, just log into your account, customize your ad unit, and copy and paste a block of HTML code into your blog. I’ll give you a walkthru of this process.
Step #1 – Sign up for Google AdSense

First you need to create an AdSense account doesn’t take more than a few minutes to do. Once you’ve got your account setup and approved, go on to step #2.

Step #2 – Add the AdSense Page Element to Your Blog

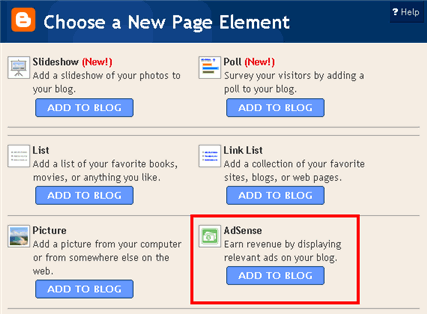
The nice thing about the new Blogger is you can easily add Google AdSense to your blog using their built in page elements. Login to your Blogger account, navigate to “Template” => “Page Elements” and then within the layout area, click on “Add a Page Element”. From there you’ll see this screen where you want to select the “AdSense” Page Element and click on “Add to Blog”.

add-adsense-element.gif

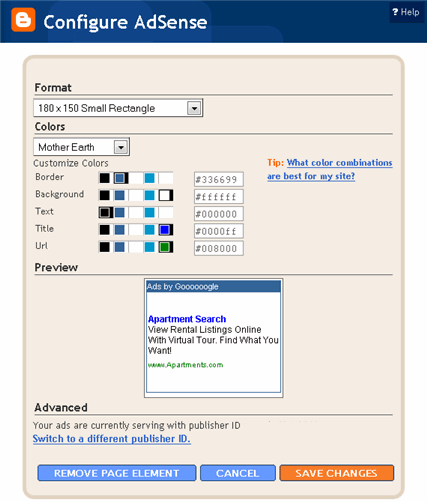
Next you’ll see another screen where it will ask you to login (if it’s the first time you’ve tried to add this AdSense Page Element before). Just enter the email address and password you used when setting up your AdSense account. Once you successfully login, you’ll next see the ad configuration screen. This is where you select the ad format type (leaderboard, banner, text ad, etc) with many different sizes to choose from. Now remember to keep your site visitors in mind when selecting an ad format. You don’t want the ad to dominate your entire blog page which would annoy your readers. I’d recommend starting with a small rectangle or horizontal row format before going too crazy.

configure-adsense-element.gif

Don’t forget to also select a nice color scheme that matches your blog. Statistics show that the more blended in your blog ads are, the better change people will click on them. Remember to abide by the Google TOS though which I encourage you to read before breaking the rules by accident. Now once you’ve got the exact color scheme and ad format ready to go, click on the orange “Save Changes” button to add it to your blog.

Step #3 – Save and View Your New Ads

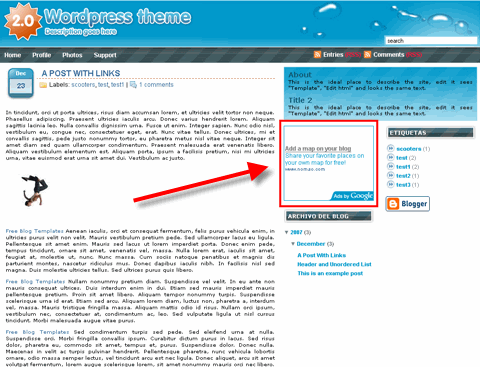
You should now save your Page layout and view your blog. The ad unit should be in place and ready to start making you money! Sometimes it takes a little while before ads start showing up and even a couple of days before relevant ads are displayed. This is usually the case if you’ve got a newer blog and Google isn’t familiar with your blog’s content yet. Google will then crawl your site and identify it’s general topic so it knows what ads to display. Pretty cool eh? Here’s a picture of the end result. Notice the red highlighted ad unit now displayed on my blog.

blogger-adsense-end-result.gif

Bonus Tips

Now a few tips and a warning before you get too giddy about all this money you’re going to start making. First, never (and I mean never) click on your own ads. Google will know and they will ban you from the AdSense program. It’s not worth it! Secondly, don’t expect the big bucks to start rolling in right away. It’s a numbers game. The more traffic you get to your site, the better chances you have of somebody actually clicking your ad. Typically with ads, you can expect a 2% – 4% click thru rate (CTR) assuming your ad is in a good spot which means for every 100 page views you get, expect 2-4 ad clicks. Translation — keep writing great quality blog posts and your traffic will increase over time and so will the ad clicks which equals money in your pocket.


Other Reasons to Use Google Adsense

  • It’s a very simple and proven solution that hundreds and thousands of blogs and websites across the world use today.
  • AdSense is by Google which is reliable and trustworthy. Once you have earned money from Google, they will pay it to you.
  • The ads will be contextual, which means they will be relevant to the content of your blog. Targeted ads = happier visitors, higher click thrus, and more money for you.
  • You get paid on the click which is far better than on a conversion.
  • Google provides free reports so you can see exactly how many clicks and how much you’ve earned! You’ll find yourself using that report every day just to see how much money you’re making.
  • The ads are so well-matched to your site’s content that your readers will actually find them useful.

So go sign up for your AdSense account now and you’ll soon be able to start making money from your blog! If you’ve got any problems or questions while setting this up, please post a comment below. We will do our best to answer any questions you may have or at the least point you in the right direction.

Please make sure to click on the AdSense links provided in this article as the sign up referral helps support and offset our expenses for maintaining this site

Also Read How to Make Money From Your Blog – Tip #2


Features

Download Now!

From 3-4 days many people are asking that they have a domain from name.com but they are having trouble setting it up for their blogger custom domain.

Here are few e-mails from the people:

Sent to Link Number: 2b04c
Sender Name: rky
Sender Email Address: XYZ@gmail.com

hi i buy doamin name via name.com
how i setup that domain name for my blogger blog please give me step by step solution for that problem …

Sent to Link Number: 2b04c
Sender Name: abhijote
Sender Email Address: XYZ@gmail.com

i have buy a new domain through name.com please give me a detail procedure to set up it on blogger account..
i really need your help

As I told that I bought this domain from name.com just for $6 with many features.I also got many problems setting that domain and some people might have seen strange things happening at that time but no worries now it’s all perfect.

Click to continue reading…

9899100101102103104105106107108109110111112113114115116117118FirstLast


whos.amung.us