BLOGGING PROFIT FORMULA

make money online

Discover The SAME Formula That I Use To Rake-In $10K+ every month! Enter your details below and DOWNLOAD The Blogging Profit Formula For FREE! This Is The Same Formula I Use To Make Money Online on Autopilot...

This blogger template is compatible with blogger beta. That means you don’t have to switch your blogger to classic template to use it. It’s a two column template with labels as the menu. I’ve tried my best to make it as usable as possible. In case of any bugs let me know.

How to install this template

  • Login to your blogger account.
  • Go to template.
  • Go to edit html.
  • Upload the template and enjoy. :)

Recommendation: It is recommended you backup your template and the widgets code first.


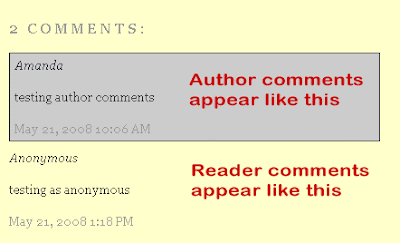
Highlighting author comments using a different background color, border or different style of text helps readers understand when you have personally posted a response.

So far, “How to Highlight Author Comments” has been the most requested article in my Skribit widget, so in this post I’ll explain how you can change comments which you have posted yourself to distinguish these from other comments on your posts.

The main obstacle I’ve faced in writing up this article so far is that different Blogger templates code the comments section differently.

While the easiest method for me to write would have been to say “Find this code and replace it with this”, such a method would only be usable by bloggers whose template matches the code.

Instead, my explanation may be a little more complicated than usual, though I hope this explanation will ensure anyone using a Blogger template will understand how to implement the highlighted author comments hack!

Backup your Blogger Template!

Before even attempting to customize your Blogger template, the first thing you should do is back up your template. This ensures you can easily restore your original template if something goes wrong. Also, as most of us cannot see comments unless we are viewing a post page, it would be impossible to see if code changes have adversely affected the comments section.

To make a backup of your Blogger template, simply go to Layout>Edit HTML in your Blogger dashboard, and click on the “Download Full Template” link. This will save your existing template as an XML file which you could use to restore your blog, just in case 🙂

Finding the Comments Block in your Blogger Template

The first thing we need to do in order to implement this hack is to locate the “comments block” within your Blogger template.

To find the comments section, you will need to tick the “expand widget templates” box as this code is contained within your main “Blog Posts” widget.

As I’ve already pointed out, the section of code used to display comments varies in different templates, so in order to find this section, you may need to search for some specific tags rather than complete sections of code.

To give you an idea of what you are searching for, here is the complete comments-block code from the Minima template:

<dl id=’comments-block’>
<b:loop values=’data:post.comments’ var=’comment’>
<dt class=’comment-author’ expr:id=’data:comment.anchorName’>
<a expr:name=’data:comment.anchorName’/>
<b:if cond=’data:comment.authorUrl’>
<a expr:href=’data:comment.authorUrl’ rel=’nofollow’><data:comment.author/></a>
<b:else/>
<data:comment.author/>
</b:if>
<data:commentPostedByMsg/>
</dt>
<dd class=’comment-body’>
<b:if cond=’data:comment.isDeleted’>
<span class=’deleted-comment’><data:comment.body/></span>
<b:else/>
<p><data:comment.body/></p>
</b:if>
</dd>
<dd class=’comment-footer’>
<span class=’comment-timestamp’>
<a expr:href=’data:comment.url’ title=’comment permalink’>
<data:comment.timestamp/>
</a>
<b:include data=’comment’ name=’commentDeleteIcon’/>
</span>
</dd>
</b:loop>
</dl>

If you are using Minima (or a similar template) you should be able to locate this section of code easily. However, some templates use <ul> and <li> instead of <dl> and <dd> tags, in which case the code you are looking for may look more like the section on this page instead, or could even be wrapped in simple

tags.

If you are having trouble locating the comments section in your blog’s HTML code, do a CTRL+F (or CMD+F for Mac users) search within your template code for the following template tags:

* <b:loop values=’data:post.comments’ var=’comment’>
* <data:comment.author/>
* <data:comment.body/>

The comments section of your blog’s HTML code should contain all three of these template tags. Simply locate these tags and the surrounding code in your template, then work out where this section begins and ends using your discretion.

Generally speaking, this section will usually begin with

or

    or

    and end with a matching closing tag.

    Changing the comments code to add author highlighting

    Once you have located your comments section in your blog’s HTML code, you will need to highlight this entire section of code and replace it with the following section of code instead:

    <ul class=’commentlist’ style=’margin: 0; padding: 0;’>
    <b:loop values=’data:post.comments’ var=’comment’>
    <b:if cond=’data:comment.author == data:post.author’>

    <li class=’author-comments’ style=’margin: 0 0 10px 0;’>
    <b:if cond=’data:post.dateHeader’>
    <div class=’commentcount’/>
    </b:if>
    <cite>
    <b:if cond=’data:comment.authorUrl’>
    <a expr:href=’data:comment.authorUrl’><data:comment.author/></a>
    <b:else/>
    <data:comment.author/>
    </b:if>
    </cite>
    <br/>
    <div style=’clear: both;’/>
    <b:include data=’comment’ name=’commentDeleteIcon’/>
    <p><data:comment.body/></p>
    <div class=’commentlink-date’><a class=’commentlink’ expr:href='”#comment-” + data:comment.id’ title=’comment permalink’>
    <data:comment.timestamp/>
    </a></div>

    <div class=’clear’/>

    </li>

    <b:else/>

    <li class=’general-comments’ style=’margin: 0 0 10px 0;’>
    <b:if cond=’data:post.dateHeader’>
    <div class=’commentcount’/>
    </b:if>
    <cite>
    <b:if cond=’data:comment.authorUrl’>
    <a expr:href=’data:comment.authorUrl’><data:comment.author/></a>
    <b:else/>
    <data:comment.author/>
    </b:if>
    </cite>
    <br/>
    <div style=’clear: both;’/>
    <b:include data=’comment’ name=’commentDeleteIcon’/>
    <p><data:comment.body/></p>
    <div class=’commentlink-date’><a class=’commentlink’ expr:href='”#comment-” + data:comment.id’ title=’comment permalink’>

    <data:comment.timestamp/>
    </a></div>
    <div class=’clear’/>
    </li>

    </b:if>
    </b:loop>
    </ul>

    The simplest way to change your comment code is to follow these steps:

    1. Copy the code above to your clipboard
    2. Highlight the entire section of your comment code in your Blogger template
    3. Paste the code from your clipboard in place of the existing code by keying CTRL+V (or CMD+V).

    One quick method to check if you have made code errors is to preview your template. If you have accidentally omitted some code, you will receive an error message. In this case, you should press the “clear edits” button and begin again.

    If you don’t get an error message, you can then proceed to save your template.

    Adding style for author comments

    At this stage, your own comments will still appear in the same style as other comments. To highlight author comments, we need to add some style code to your blog template.

    This step is much easier than locating and changing the comment section. Simply locate the closing tag in your Blogger template, and immedietly before this, paste the following section of code:

    .author-comments {
    background: #cccccc;
    border: 1px solid #333333;
    padding: 5px;
    }

    If you prefer, you can change the hex colors (#cccccc and #333333) to match the color scheme of your own template (discover the color codes for your preferred schemes using the web color calculator).

    Then save your template.

    Now when you make a comment on your blog while signed in to your Blogger account, your comments will have a different border and background color to comments posted by your readers.


Many People in last few days told me that your blog is opening very slow.I was in tension due to this from many hours today..but i resolved it>And Now You Can See the Result>>>

See The Image.I have conducted my blog speed test with diffrent speed types

So Now If anybody still having problem just reply with your Net Speed,Place,Provider.I will try my best to reduce the problem,

Thank You!

Star ratings is a new feature currently available through Blogger in Draft. This enables you to add a widget beneath your posts which readers can use to rate your articles on a scale of 1-5, like this:

If you use a default Blogger template, you should be able to activate this feature right away when logged through Blogger in Draft: simply go to Layout>Page Elements and edit the “Blog Posts” widget to activate the display.

However, those using a customized or third party template will need to add the required code to their templates first. In this tutorial, I’ll explain how you can add “star-rating” functionality to your customized Blogger template.

To use the “star ratings” feature, you will first need to activate this through Blogger in Draft (it’s still in beta, and not yet available for use in the regular Blogger dashboard).

Log into Blogger in Draft and choose the blog you wish to work with. Then go to Layout>Page Elements, and click the “Edit” link on the “Blog posts” widget.

This screen offers many options for you to add (or remove) from the posts section of your blog. If you scroll down a little, you’ll see the “star ratings” option. Tick this option to activate this setting for your blog, then scroll down to save your settings.

If you are using a default template, you should see the star ratings widget appear on the post pages of your blog. However, if you have customized your template (or are using a third party template), it is likely that your template does not include the code required to make the star ratings display.

Here is how you can add the required code for star ratings to your non-standard Blogger template

Step 1: Backup your existing template. I assume you know it very well so I am not gonna explain it again.

Step 2: Expand widget templates and copy the entire code some where in Notepad or something. In case something goes wrong, you have the entire widget code.

*Step 3: Go to ‘Layouts’ and under ‘Blog post’ widget, select Star rating. And save the changes.

*Step 4: Go to ‘Edit HTML’ and select ‘Expand widget templates’.

Step 5: Search for this line of code:

<p><data:post.body/></p>

Step 6: Copy the following code right after the above line of code:

Click here For The Code!

Step 7: Now again search for following code:

<b:include name=’feedLinks’/>

This line you may find several times, so make sure you seek for the last instance at the bottom of the code which should ideally be before the start of sidebar codes. So when you see this line, it should look something like:

<b:include name=’feedLinks’/>

  </div>

            </div>

        <div class=’cont-bottom’/>

        </div>

        </div>

        </div>

 </b:includable>

</b:widget>

</b:section>

….

….

<div id=’sidebars’>

Step 8: Copy the following code right after the line mentioned above:

<b:if cond=’data:top.showStars’>

    <script src=’http://www.google.com/jsapi’ type=’text/javascript’/>

    <script type=’text/javascript’>

      google.load(&quot;annotations&quot;, &quot;1&quot;);

      function initialize() {

        google.annotations.setApplicationId(<data:top.blogspotReviews/>);

        google.annotations.createAll();

        google.annotations.fetch();

      }

      google.setOnLoadCallback(initialize);

    </script>

  </b:if>

Step 9:Preview your changes without saving it. You should see the star rating in each post on your blog posts on the main page itself.

Step 10: That’s it, save your template if satisfied and enjoy the Star ratings on your blog.

Also let me know if this post helped you in customising your template by dropping a comment here or at least leaving your rating.

Hey freinds I need your suggestion for giving this blog a name i.e I m willing to buy a domain for this blog for which i seriously need your suggestions.. I m not thinking to buy web hosting for it now since as a 15 yr old student i won’t be able to handle that much work so right now i only want a domain..Please help me in deciding a good domain name which is good in terms of SEO and which suits the things which i wil be sharing on it which are blogger template,hacks,tips n tricks of blogging,Make Money Online tips,PTC Sites Reviews,Tech News like launch of some new gadget or website useful for bloggers..

I also need to know from where should i buy the domain.Many people refers goddady.com but name.com is providing .com domains more cheaper than godaddy but i don’t know the features which they provides.
So guys , Please tell me some good domain names,which are good in terms of SEO with a good Punch Line..The person suggestion who i will like the most wll get 200 EC from me..

103104105106107108109110111112113114115116117118119120121122123FirstLast


whos.amung.us